Hi All,
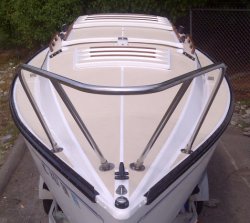
I have just completed the dreaded keel pin/bracket replacement on my Starwind 22 (just fyi, the fittings are almost exactly the same as the C22). Not knowing how to post images here, I have posted a bunch on my fb page: https://www.facebook.com/profile.php?id=100008151311802
Or look on fb for Shaun Sanders adjunct Santa Barbara.
The job is hell, but it's worth doing knowing that the keel is secure. When reinstalling, I shimmed up the pin and now have no keel clunk. No leaks either:)
Contact info for the ss fabricator I used in Ventura Ca.: Mike Owens, Shoreline Metal. https://www.shorelinemetal.com
Mike is a great guy and makes great suggestions. I used 304 SS and he charged me a mere $325, including spare pin. He followed the plans posted on this blog somewhere (wish I could find them again), although we did make some adjustments, so check your old brackets against the drawing before ordering. I'm also happy to answer any questions. My new brackets needed additional correction: I countersunk the bolt holes and use flathead ss screws instead of bolts; I also had to grind off the top edge of the new brackets (where they fit against the hull at the top of the housing) to make the bolt holes line up with the hull bolt holes, and to make the fit snug--but talk to Mike about that as well.
Reasons for keel movement, before the big fix: It seems the keel can slide on the pin, as much as maybe 1". Also, while the old pin was set solidly into the brackets (maybe the ends had been glued in), the pin fit inside the keel hole was surprisingly sloppy--the old and new ss pins had considerable movement inside the hole in the keel, and within the new brackets. I was surprised to find this and would recommend inserting an over-sized pin to stop the angular shift--maybe a .015" larger: I didn't realize this until I was in the midst of assembly, so I made some .015" curved ss shims and slipped them inside the hole in the keel to tighten the fit. It worked wonders, although I do wonder how long they'll stay put. The new bracket holes also had play in them ( not sure why), so it seems they would accommodate the larger pin without any extra drilling. I ended up shimming both new brackets and the keel. I had to chamfer the head of the pin considerably before inserting, and I needed a hammer to drive it home, but hey, it's ss, it can take it:)
To get the boat off the trailer, I used 50 gal steel drums, with blocks of wood under the stern and three 2"x8"x10' planks bolted together as a beam to support the bow (probably over engineered). I did the old trick of dropping the trailer tongue, sliding the drums under the stern, raising the tongue, then sliding the beam under the bow, also on drums. Then pulled the trailer out from under.
Finally, I used coal tar epoxy on the keel, Rustoleum. I would not recommend it, though. I ground off old paint and rust with a grinder, then wiped down with acetone. I then immediately coated (after the acetone dried) in coal tar epoxy. I gave it two coats, taking the recommended time between coats. Unfortunately, it is not easy to get an 800lb keel back in a 3-4 inch slot, and the keel inevitably scrapes against the new brackets and the keel slot when going in. To my horror, when the keel scuffed, the coal tar epoxy rubbed off in rubbery lumps, leaving bare metal, and this was two weeks after it had been applied. I was greatly disappointed by this unexpected result. Apparently, it doesn't set hard, like a normal epoxy would. If I did the job again, I'd use a regular paint type rust primer, not coal tar.
Let me know if I can be of any help.
Happy sailing.
Keel Repair from A-Z 22ft
-
shaunsanders
- Posts: 5
- Joined: Mon Sep 01, 2014 7:01 pm
Keel Repair from A-Z 22ft
Starwind 22 c22
Santa Barbara Ca.
Santa Barbara Ca.
-
EmergencyExit
- Site Admin

- Posts: 2956
- Joined: Wed Dec 10, 2003 5:02 pm
- Location: Mississippi Gulf Coast
That doesn't sound right for coal tar epoxy. It does have some stretch (elongation as the manufacturer calls it) which makes it superior to other epoxies for durability. Rustoleum strongly recommends, per their application page, that when applying two coats, each coat (thinned with Xylene) and applied at 8-10 mils with air equipment. How did you apply the epoxy? Did you use the 4:1 ratio for the activator component?
I can imagine how frustrated you were after all that work. I'm going with the same coal tar epoxy product and will post my results. Your post definitely gives me some ideas of how to proceed. Mainly, that I'll be doing a test on some scrap steel and let stand for week or so.
Bob
I can imagine how frustrated you were after all that work. I'm going with the same coal tar epoxy product and will post my results. Your post definitely gives me some ideas of how to proceed. Mainly, that I'll be doing a test on some scrap steel and let stand for week or so.
Bob
-
shaunsanders
- Posts: 5
- Joined: Mon Sep 01, 2014 7:01 pm
Guitar and ct epoxy
Re the guitar, I study flamenco guitar, and that one was handmade by a local luthier in Santa Barbara--Bruce Wood. It's an ok guitar, but not as nice as the one I have now, which was made in Granada, Spain.
As for the CT epoxy, my ratios were correct. I applied it with a brush. I didn't thin it at all--I didn't see anything in the directions that suggested I should, but perhaps I didn't read the teeny tiny print on the can closely enough.
Good luck with CT application.
As for the CT epoxy, my ratios were correct. I applied it with a brush. I didn't thin it at all--I didn't see anything in the directions that suggested I should, but perhaps I didn't read the teeny tiny print on the can closely enough.
Good luck with CT application.
Starwind 22 c22
Santa Barbara Ca.
Santa Barbara Ca.
-
CaptainScott
- Site Admin
- Posts: 3111
- Joined: Wed Sep 24, 2008 10:46 am
- Location: Washington State
- Contact:
-
EmergencyExit
- Site Admin
- Posts: 2956
- Joined: Wed Dec 10, 2003 5:02 pm
- Location: Mississippi Gulf Coast
Good Luck with that Scott,I'm not a good candidate, they are beauties, but too much work for me , lol..Actually my first guitar was a nylon string..Current Inventory;CaptainScott wrote: Better look out EE!
another catgut guitar in our mists! LOL!
We may have to convert you!
Scott
mid 80's Takamine EN20 Jumbo Acoustic
mid 60's Kay Vantage
early 60's Silvertone solidbody
early 90's Peavey Raptor
-
AnchoredScott
- Posts: 1
- Joined: Mon Jan 14, 2019 9:54 am
Re: Keel Repair from A-Z 22ft
What did the pin cost you? Did your brackets need to be replaced?
Hi I'm Scott + am a Newbie to the Forum.
Thanks
Hi I'm Scott + am a Newbie to the Forum.
Thanks
Re: Keel Repair from A-Z 22ft
tried to find the pics on your fb but didn't see any?