C22 Keel Restoration - Part 1

Post All Keel Topics Here
Post Reply
User avatar
C22Bob
Site Admin
Site Admin
Posts: 143
Joined: Mon Sep 24, 2012 12:03 pm
Location: Knoxville TN

C22 Keel Restoration - Part 1

Post by C22Bob »

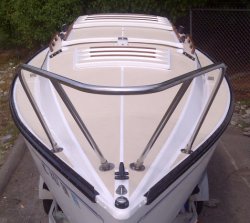
Wanted to share my keel restoration pix as I get ready to install her. As you can see, I had the usual deep pitting and scaring. Quite an ordeal with my power grinder using grinding wheels, cutoffs, and wire brushes.
Hardin Valley-20141113-00068.jpg
Hardin Valley-20141118-00070.jpg
Hardin Valley-20141118-00072.jpg

Punched out the old sleeve and pressed in a new stainless steel sleeve with 3/4 inch bore for beefier support.
Hardin Valley-20150306-00117.jpg
Also, capped it with flanges each side to support the sleeve ends.
Hardin Valley-20150319-00118.jpg
The keel epoxy filler is Simpson Strong-Tie FX-738 Metal-Filled Epoxy Paste.--->>>>Product PDF<<<-----

Powerful stuff and reasonably priced.
Hardin Valley-20150320-00128.jpg
After final sanding, brushing, and cleaning painted with Rust-Oleum High Performance C9578 System Coal Tar Epoxy
0160720.jpg
0160720.jpg (19.57 KiB) Viewed 21467 times
3 coats thinned at 12% each, waiting 24 hours between each coat. Great stuff and economical. Gallon runs about $75 from McMaster-Carr. After waste, still had 1/2 gallon left.
The trick with this stuff is to apply all coats and forget it for a week and come back. It takes about that much time for it to fully harden into a very hard, durable finish.
IMG-20150323-00142.jpg
IMG-20150323-00143.jpg
I plan to add two coats of Sherwin Williams Macropoxy 646 for the final finish


More to come as I finish this phase...
Reality
Posts: 185
Joined: Sat Oct 11, 2014 7:11 pm
Location: Ellison Bay, WI

Post by Reality »

nice set of photos (thanks) and good job.
User avatar
CaptainScott
Site Admin
Site Admin
Posts: 3111
Joined: Wed Sep 24, 2008 10:46 am
Location: Washington State
Contact:

Post by CaptainScott »

Beautiful!
Scott
User avatar
mcrandall
Site Admin
Site Admin
Posts: 658
Joined: Sat Nov 27, 2010 9:35 am
Location: Muskegon, MI
Contact:

Post by mcrandall »

Sweet! Very nice job, and thanks for sharing!
Mark
http://s1213.photobucket.com/albums/cc4 ... ew%20C-22/
1975 C-22 currently named Stardust (soon to be "Angela Marie")
User avatar
astrorad
Posts: 730
Joined: Fri Feb 19, 2010 8:09 pm
Location: s.e Wisconsin

Post by astrorad »

Beautiful job Bob...looks nicer than mine. I also used the coal tar epoxy. I did not thin and only put on two coats, but it seemed to turn out well. Looking forward to see the completion.
Bill
Reality
Posts: 185
Joined: Sat Oct 11, 2014 7:11 pm
Location: Ellison Bay, WI

Post by Reality »

dumb question : is the keel one solid piece of forged steel? Doesn't look like cast iron. How did it get so pitted? thanks
User avatar
C22Bob
Site Admin
Site Admin
Posts: 143
Joined: Mon Sep 24, 2012 12:03 pm
Location: Knoxville TN

Keel design

Post by C22Bob »

Reality wrote:dumb question : is the keel one solid piece of forged steel? Doesn't look like cast iron. How did it get so pitted? thanks

The C22 keel is referred to as a 'shell casting'. It's cast iron over a stainless steel inner plate. A portion of the stainless plate is exposed where the lift cable attaches. My guess is that the inner SS plate extends the full length of the keel to include the sleeve/shaft area.

As for "...How did it get so pitted". My keel was badly rusted. Every layer I cut off with a grinder would show another layer, and so on..I was determined to get all of it. I used both 4.5" and 7" angle grinders with various attachments and as I like to say, 'I went medieval on its ass'
User avatar
C22Bob
Site Admin
Site Admin
Posts: 143
Joined: Mon Sep 24, 2012 12:03 pm
Location: Knoxville TN

Post by C22Bob »

astrorad wrote:Beautiful job Bob...looks nicer than mine. I also used the coal tar epoxy. I did not thin and only put on two coats, but it seemed to turn out well. Looking forward to see the completion.
Bill,...thanks. Glad to see someone else going with the coal tar epoxy. The stuff was so thick I decided it was better to go with multiple thin coats than one or two thick coats. In hindsight I should have stayed unthinned because after 3 coats I'm not sure I have the 20 mil DFT. I posted I was going to overcoat with SW Macropoxy 646. but I've decided instead to apply another unthinned coat of the coal tar epoxy and leave it semi-gloss black..

/Bob
Reality
Posts: 185
Joined: Sat Oct 11, 2014 7:11 pm
Location: Ellison Bay, WI

Post by Reality »

thanks for the additional info about the keel. Again, nice work.
User avatar
astrorad
Posts: 730
Joined: Fri Feb 19, 2010 8:09 pm
Location: s.e Wisconsin

Post by astrorad »

Bob...that sounds like a good plan.
Bill
Harry
Posts: 2
Joined: Tue Apr 21, 2015 2:00 pm
Location: Florida, United States

Missing Keel for my C22

Post by Harry »

Greetings- I just bought a 1983 C22 (Wellcraft/Starwind) with a missing swing keel. I have checked out a couple of great videos about how to restore, very helpful. Thanks for posting those. Does anyone have an idea where I can find a keel for my new/used boat? Thanks, Harry
Never put off until tomorrow what you can do today
User avatar
CaptainScott
Site Admin
Site Admin
Posts: 3111
Joined: Wed Sep 24, 2008 10:46 am
Location: Washington State
Contact:

Post by CaptainScott »

Welcome aboard!
Scott
Harry
Posts: 2
Joined: Tue Apr 21, 2015 2:00 pm
Location: Florida, United States

Is this the same keel?

Post by Harry »

Well, I've located a keel from a 1975 Chrysler 22. Does anyone know if that's the same as the missing keel for my 1983 Wellfleet/Starwind? I suspect it is, but I didn't want to drive 200 miles for nothing. Thanks, Harry
Post Reply