Page 1 of 1
Designing a new electrical system, input please!
Posted: Sat Oct 29, 2011 4:13 pm
by N41EF
Started today replacing lights and such, and just cleaning things up. Other than wires runing to the nav lights and one interior light I'm redoing everything from scratch.
I plan to use a lawnmower sized battery mounted on the port side of the potty. I need to shift weight forward which this will help. That size lead acid gives about 300ah, and if needed there is a marine AGM battery of the same size. I'll put it in a small battery box and secure it to the wood under the potty. I'll run the power up and down the port side to a battery switch.
I want to mount a dual battery switch aft port. Under normal day sailing I'll use just the small fwd battery, but have a second box centerline under the keel winch for the full size battery that I can install and use for overnight trips.
Connected to the ship's side of the switch i'll hardwire a marine battery charger to trickle charge battery(s) the night before we go sailing. The switch allows to charge either or both batteries.
Next downstream is a 6 position breaker/led switch panel I found on eBay cheap. the loads are:
1) anchor light
2) running lights
3) steaming light on mast
4) deck lights
5) Instruments/bilge pump
6) Int lights
I'll mount 2 fused 12v power sockets for charging phones or VHF radio. That also gives me a place to plug in a solar charger or two to top off batteries while running.
I plan to tun all wiring down the port side as original, and initial checking loks like the original wiring is in great shape, but the lights are bad. I'll splice in, solder, and heat shrink the new lights in.
I have an LED front nav light, looking for a LED stern light, have a led steaming/deck light, and an led anchor light, so drain shouldn't be too bad. I'm going to use a stern light that is removable and plugs into a flush socket to keep it clear of the rear stays. I have a small depth finder that is has an lcd display, will measure the current draw but don't think it's much since it has a 1 amp fuse. Theoreticaly, every light on shouldn't draw more than 6 amps. The bilge pum should draw about 3 amps but it has a built in float switch so shouldn't run much, i HOPE.
I'm going to rwire the mast with the "common ground" idea some one else used, with a 4 wire deck fitting. Also like the idea of wire tying and leaving pigtails to keep wires from ringing. I have a huge amount of E and EE wire which is tined marine grade.
I have done a sketch of a wiring diagram, will take pictures and post the final wiring diagram.
Looking for your thoughts and input.
Posted: Sat Oct 29, 2011 5:45 pm
by lecker68
It looks good but I would have the bilge pump not in the panel but a switch and fuse of its own switch is in conjunction with a float switch it is a
man./ auto especially if it is going to stay in the water or unattended in water or on trailer.
Posted: Sat Oct 29, 2011 7:01 pm
by N41EF
My thought, however fleeting, was that 90% of the time, the only thing that will be on was the depth finder and the bilge pump in auto. Load wise, they could share a 5amp breaker, or even a 10amp. My boat sits on a trailer, so I don't loose sleep over sinking.
My procedure would be the battery switch is in off unless the boat is in the water. As soon as I back in, turn batter to the "main" small battery and turn on the depth finder/auto bilge pump. Unless the bilge pump is running a solar batt charger would provide more than required, as the bilge pump cycles the batt would discharge a bit.
The bilge pump is 500 gph with a 3/4 discharge, that I plan to let pump into the aft compartment so it can run out the rear scuppers, not much head loss so should flow good.
A simple turn on the batt, flip one switch and we are ready to go.
Posted: Sat Oct 29, 2011 8:55 pm
by Paul
I had a really-way-out-there-wierd thought as I began planning my rewiring. Since I trailer my boat, and may even do some camping in it, I thought about putting a connector point at the top of my trailer winch tube with a matching connector just port of the forward nav light. While trailering a jumper could be plugged between the trailer and the boat to charge the batteries. It could also be left in place during camping in order to drain my vehicle battery overnight.

Paul
Posted: Sat Oct 29, 2011 11:10 pm
by mcrandall
That's not too "out there", Paul. A couple folks here have mentioned doing that and somebody (red boat, sorry, memory isn't any better than that) showed a connector jack in the front deck with circuit breakers underneath. My guess is those were for just that purpose.
At the very least, you could hook the batterys up to get a charge on them while you're motoring down the road.
And camping in these things was one of the original selling points.
It's all good!
Posted: Sun Oct 30, 2011 9:18 am
by Alanhod
Hmm, I always have something to add when it comes to an opinion on wiring. I'm thinking you have it covered here already.
I like Pauls power wiring from the trailer Idea.
I like Captain Scotts LED in the main panel that comes on when the master battery switch is on.
The lawn mower battery, is it a deep cycle battery? Or are you using it for the electric start on your outboard?
You have the solar panel idea already incorporated, which I love on my boat.
Your heat shrink tubing over your connections.
You have a panel and a mast power switch.
You have a bilge pump with a float switch and an on/off switch.
Your LEDing everything.
Single ground on a 4 wire going through the mast.
Removable stern light.
I like it, I'm going to give your wiring plan two thumbs up. Way up!

Thanks
Alan
Posted: Sun Oct 30, 2011 9:22 am
by lecker68
I did the plug while on the trailer on the Newport I had and it worked well while trailer sailing.
Posted: Sun Oct 30, 2011 10:00 am
by N41EF
Slept well, more thinking. I have an hour meter that I picked up for a lawnmower. Wired on the load side of the master switch it would log how many "fun" hours I've gotten. not sure what the happiness factor would be, so far about 30 hourse cleaning and fixing to 3 hours sailing. I also have a dc volt meter, which I may install as well, with a momentary pushbutton to check battery voltage.
The initial small battery came from my lawnmower, non-deep cycle. Once i've satisified proof of concept I'll buy a deep cycle marine battery in the same size.
Posted: Sun Oct 30, 2011 3:42 pm
by troyengel
I had to rewire all the wiring the prevois owner did. so I have some input. Most of the O.E wiring and panel are still in my boat. (still in good shape also) so I just had to redo the supply and battery box. I did install a plug for the outboard, Mine has an electric start. so I plug it in when I put it on. I trailer the boat. so I don't leave the motor on it. these things can walk off. I have used the plug to recharge the battery. this makes in nice and handy. I just plug the battery charger into it. and away she goes. I still have to fix the mast light. its the only light that does not work. and one have a pin out of the mast connector, I tried to ohm it, and to add power. but I could not match up any of the wires. I think it might just be open. I tried to pull the plug apart. but they really put that thing together well. I also have bilge pump installed in the port side compartment under the table seat. it was wired to the panel. so I've left it there. seems to work fine.
So I recommend you keep it simple, I like to use shrink butt connectors, they work great, and I dont have any problems with them.
Good luck. please keep use informed.
Posted: Mon Oct 31, 2011 6:55 pm
by Paul
OK, since my last "way out there" thought didn't receive undue condemnation - here goes another.
I talked with a wiring supply guy tonight and ran this concept by him with these caveats:
1) I sail fresh water only
2) I'm going all LED so I have very low amperage on all circuits
3) Everything is 12V DC
To do my rewiring I thought about using the 7 strand wire made for use with irrigation systems. It is waterproof in order to be burried underground and run into the valve control boxes. The wires are nicely color coded within the bundle. My concern is wire size - 20 ga, but this should be fine with the led draws.
I stand by for castigation if it is warrented.
Paul in (snow tomorrow & next sat

) Denver
Posted: Tue Nov 01, 2011 11:55 am
by mcrandall
A little light for my preference, but ought to work, as long as you don't put too much load on each line. Just make sure you properly fuse the lines.
Example: Say those 20 ga lines will support about 1.5 amps and you put no more than 1 amp load on each line. If you fuse them for 1.25 amps, you'll never have to worry about them burning up like Bondo's did cause the fuse will break long before you reach the limit of the wire. Make sense? If not fused to that level and accidentally shorted, those little wires will burn up quick with the hundreds of amps a battery can lay on them.
Posted: Tue Nov 01, 2011 4:14 pm
by N41EF
20 gauge isn't an issue, but the solid/stand wire is more of an issue. If the sprinkler wire is solid it wasn't designed for the flexing of a mobile instalation.
Since the highest load I found on any boat bulb circuit is 10w for a non-led deck light:
10w/12vdc= .833 amps
so if it's a single load on a single circuit 20 gauge should be fine.
LED's draw much less so if you are single circuit size would never be an issue.
After reading the issue of the on-board fire I think i'm revising the plan to put inline fuses on both batteries, 20 amp on each as a failsafe in case a direct short which would cause a fire.
Posted: Tue Nov 01, 2011 4:42 pm
by mcrandall
Agreed--never use single stranded wire. Guaranteed it will break.
Posted: Tue Nov 01, 2011 9:03 pm
by Paul
Thanks, I hadn't considered the single strand aspect. Now I guess I'll have to re-wire my sprinkler system as well.
Paul
Snowing tonight (8 - 10") and snow expected again saturday
Posted: Wed Nov 02, 2011 8:04 am
by mcrandall
Only if your yard moves around a lot, Paul. But if that's the case, you've got a lot more trouble than sprinklers!
Posted: Fri Feb 17, 2012 4:18 pm
by N41EF
So, was nice today and made a templete for the electrical panel:
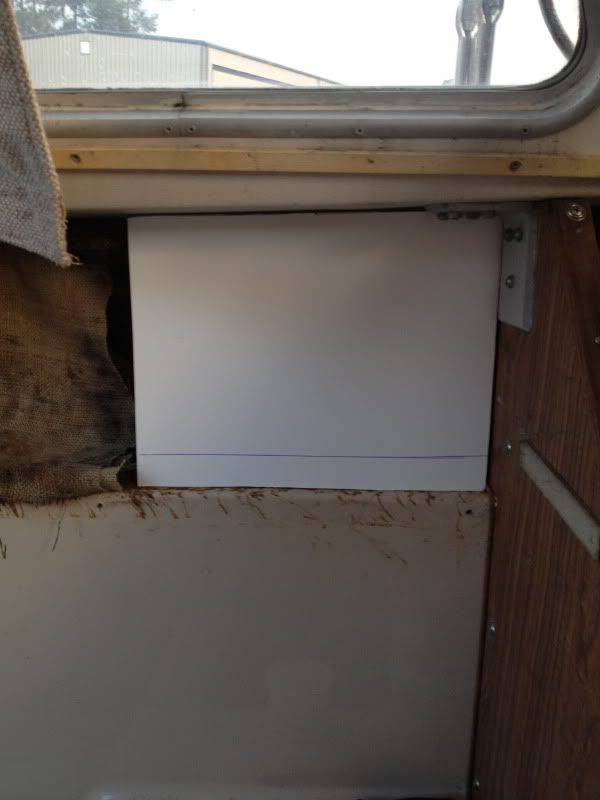
It's approx 10.5 high and 13 inches wide, will sit on the fiberglass and rest against the back of the alluminum support. I'll use either 1/4 inch plywood, or a sheet or plastic if I can find something I like. The ink line is where the wood trim coverss. It has a very slight curve on the top.
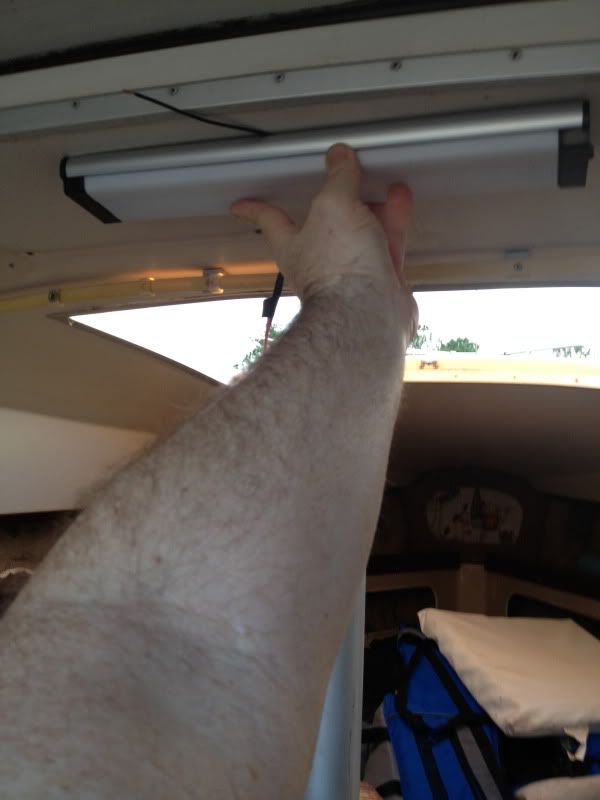
I found an 8w flourecent light with a built in switch, will mount one centerline just aft of the center pole and one all the way forward for the berth.
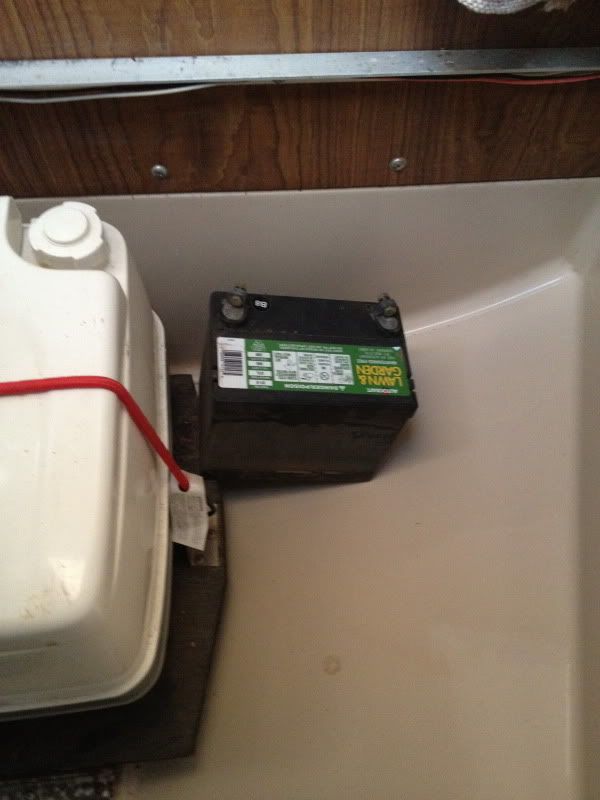
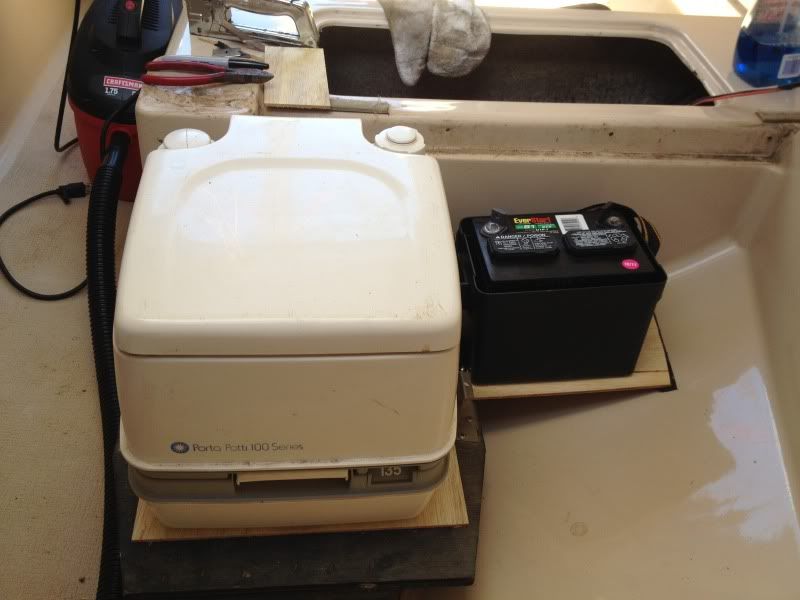
The battery will go in a batt box mounted on plywood outboard the pooper, they make a marine grade lawn-mower size battery and boxes:
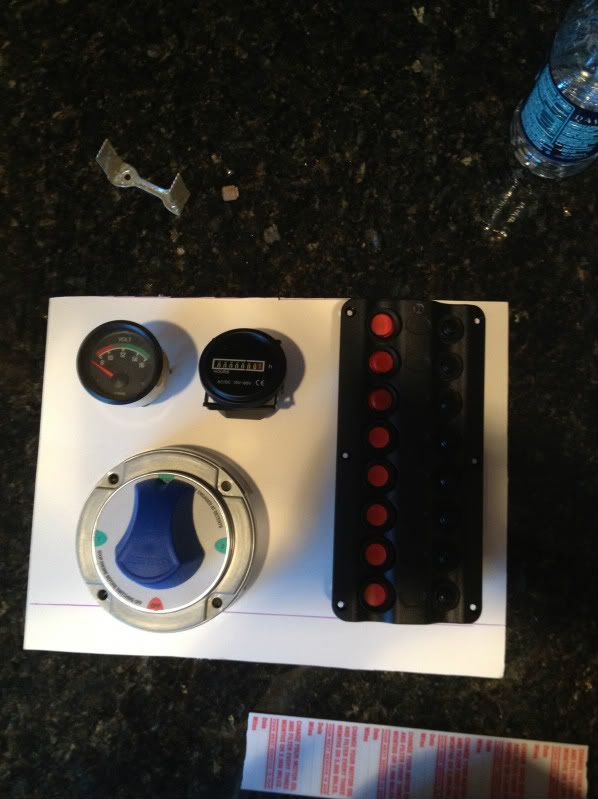
And I think I'll mount the breaker panel forward, the batt selector aft of that, and a voltmeter with a momentary switch and a hobbs meter above the batt selector:
I'll wire the onboard batt charget to Batt one so it is isolated and I only plan on using a second battery for ocean adventures, and will use a temp solar charger when I go there.
Posted: Tue Feb 28, 2012 6:17 pm
by N41EF
Weather has been nice, finished the electrical panel for now. Luan plywood cut to fit, three coats of spar varnish. Mounted the compnents next will be wiring.
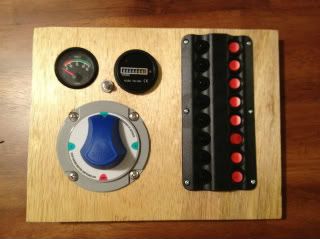
I've decided on an 8 circuit instead of the original six circuit.
Anchor light
Steaming light
Running lights
interior lights
instruments
bilge pump
bilge pump 2
acc sockets (2)
Will start wiring this week and hope to get it in the boat this week. I'm running 20awg twisted shielded pair to the front and stern light. I need to see how much current the interior light runs at. The silver switch in the middle is for the volt meter, push to check bus voltage. I'm drawing a wiring diagram now, will post it when I get it finished.
Posted: Sun Mar 11, 2012 12:24 pm
by N41EF
Used the leftover luan plywood to make a base, with two layers of stick on rubber to prevent chafing:
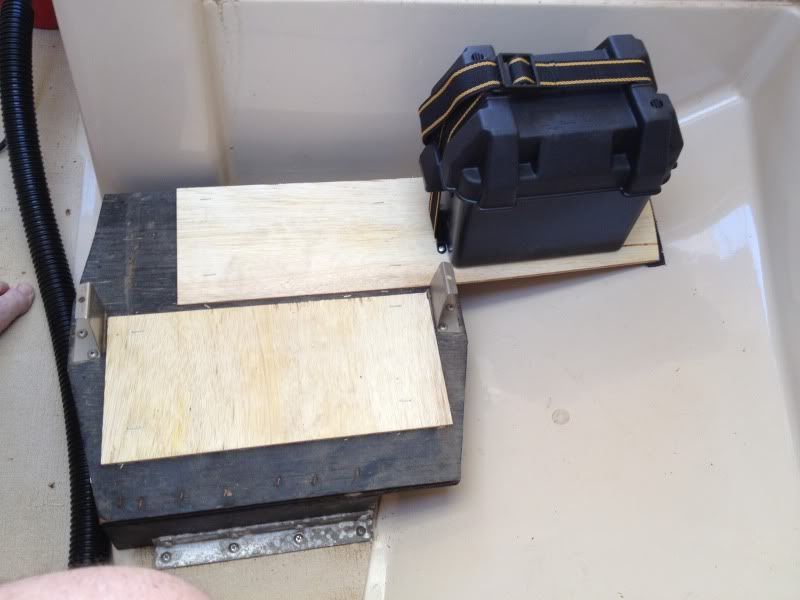
Doesn't interfer with the "facilities". Raised the front up with a scrap to keep the seat level. Stapled the ply down and things fit good.
Posted: Mon Mar 12, 2012 7:05 pm
by Holiday
The small battery box is a nice touch. Where did you find it? I use a similar size wheel chair battery,but I have been using a full size box with shims inside to hold the battery still. I have one of those fluoresent lights they work great.
Posted: Tue Mar 13, 2012 4:03 pm
by N41EF
I found the small battery box at Bass Pro Shops, on the shelf. My idea is to use a lawn mower sized battery until the bugs are worked out, then buy an AGM marine battery the same size,
Posted: Sun May 13, 2012 10:35 am
by N41EF
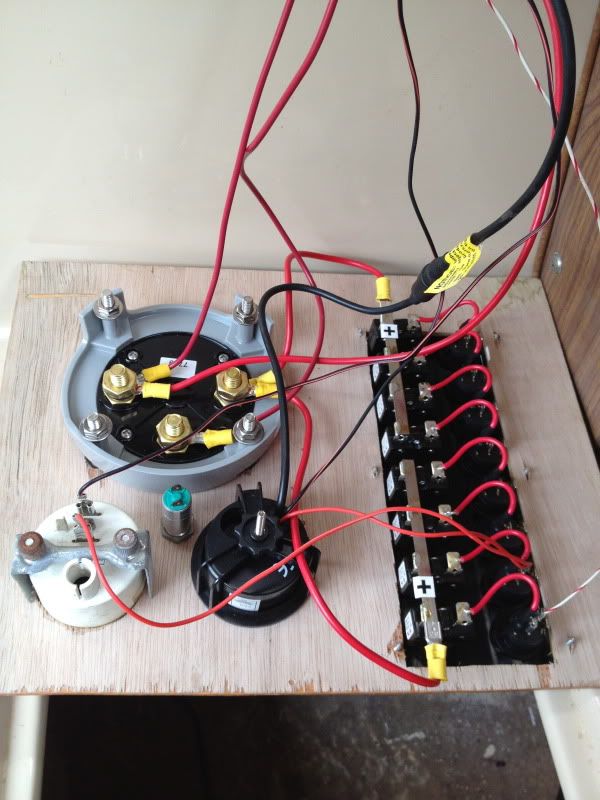
A few modifications and it isn't even done yet. I mounted an on-board battery charger in the aft port corner. It's hardwired to the battery at the battery selector switch.
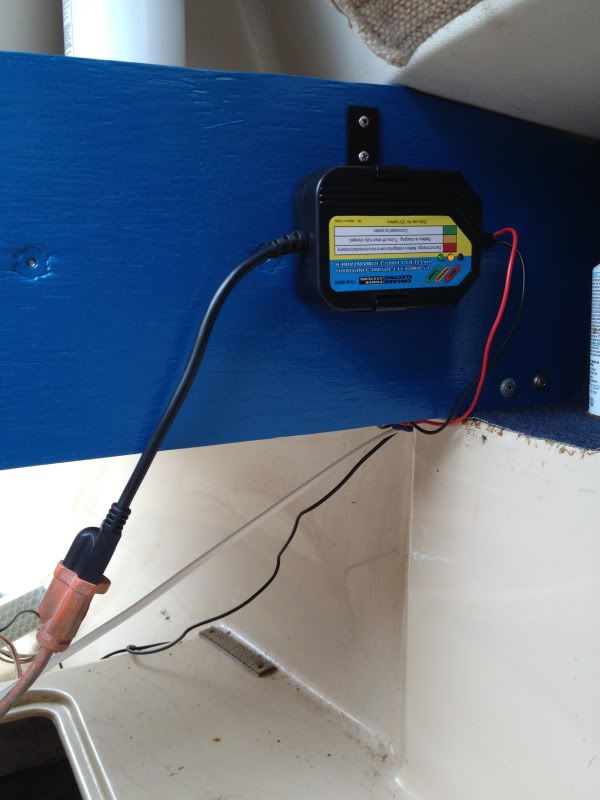
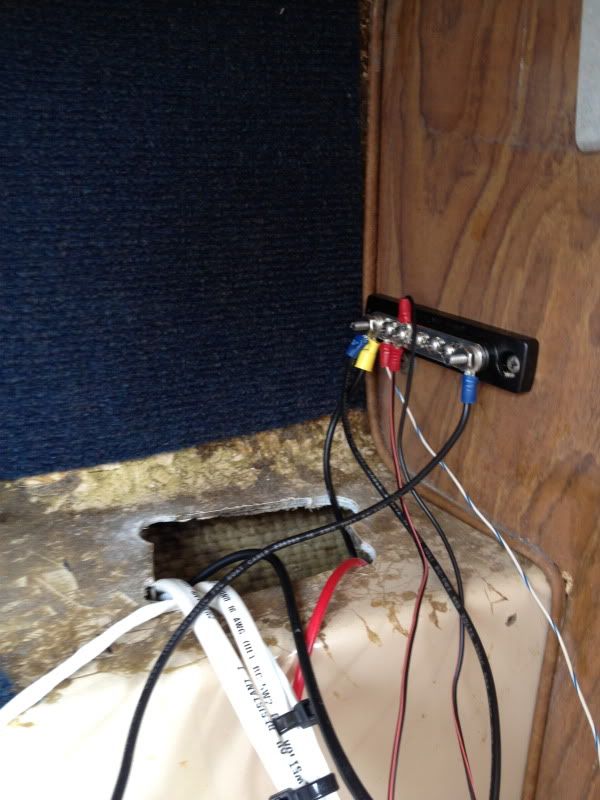
For all of the negative connections I bought a terminal tie strip at West Marine. Mounted it on the bulkhead behind where the electrical panel will go. The battery and charger connect tot he big studs, lights and small loads go to the screw conections.
I found out that Nissan makes a charging kit for all of their small outboards, so instead of a second battery I bought the charging kit and installed it. It puts out 13v at about 2 amps so I'm using it connected to BATT 2 on my battery switch. I used a trolling motor two wire connection mounted in the gas locker aft to be able to disconnect the motor for removal, also would allow a second battery installed there if I needed it.
I also figured the hour meter wasn't needed, so I mounted my depth sounder in the electrical panel. Setting the depth alarm for a warning means it doesn't always have to be visible. Wiring is getting busy!
Posted: Mon May 14, 2012 3:13 am
by Rivercruiser
Looks good!
Posted: Thu Dec 06, 2012 11:28 pm
by dubbinchris
Some great ideas there. Ever make up that wiring diagram?
Any photos of the final installation of the panel? What thickness Luan did you use?