spreader mounts
spreader mounts
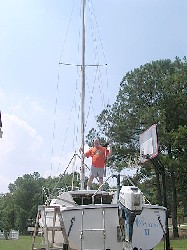
about to attach my Dwyer spreader mounts on the Sea-Shell-E and wondering if I should use something like 3D 5200 to "glue" the spreaders in place... Any suggestions??!! 
spreader
Robbie
Just my humble observation, but does not the spreader mounts and the spreaders already have small holes drilled for say carter pins or small mounting bolts? Are you looking for perhaps a stronger overall grip? I can see how 3m 52 or 4200 could help you there, but I foresee a nightmare if for some reason you should ever need to replace them.
Terrence
Wilmington N.C.
Chrysler 26 1980
Pandora (for now)
-
kalamazoogal
- Posts: 34
- Joined: Thu Jul 01, 2010 5:05 am
- Location: a long way from any oceans
spreader mounts
Just make sure the mast is supported internally or you may end up with
the same situation I faced earlier this summer with the mast starting to
dent inwards from the thrust of the spreaders.
the same situation I faced earlier this summer with the mast starting to
dent inwards from the thrust of the spreaders.
KalamazooGal 1977 C-26
Kalamaxoogal, yes, the mounts and spreaders have ability to attach to each other, I'm referring to "glueing" the mount to the mast. I, too, have some "caving in" where the previous owner attached the prior spreader mounts too tightly. I'm trying to keep from tightening them that far, and wondered if using some sort of adhesive may help.
-
Mario G
When I last did mast work on Windward, I found there was no compression tube in the mast between the spreaders, the bolt holes in the mast had wallowed out some, the bolt was a bit bent, and the spreader sockets had dimpled the mast.
I sail Windward pretty hard, and wanted the standing rigging to keep things standing. I ordered some 1/8" stainless plate, some thick-walled 3/8" ID stainless tubing, new spreader sockets and some miscellaneous bolts, washers and nuts.
I have some pics somewhere, but not any where web accessible just now, however....
I began by cutting a chunk of wood in the same shape as the mast cross-section. I then designed a pair of reinforcing plates that would conform to the mast shape beneath the spreader sockets. A local shop cut these out 1/8" stainless for me and used the template to bend them into roughly the correct shape. I also had them drill some #10 sized holes around the perimeter. I'll call these the cheek plates.
Pretty sure I stayed with a 3/8" through bolt. I ordered thick-walled stainless tubing with an ID to fit, then drilled the existing holes in the mast for a tight press fit with the tubing's OD.
Beginning without the spreader sockets in place, I inserted the bolt through one of the cheek plates, inserted the stainless tube from the opposite side of the mast to guide the assembly into place. I then clamped it in place and drilled maybe 4 or 6 or the perimeter holes, tapped them and affixed with #10 screws. Pressing the tube in hard, I marked the excess side so than when I cut it it would be even with the rest of the mast -- extending just proud of the slight concavity.
I then attached the remaining cheek plate the same way as the first.
I then disassembled it all, being careful not to drop the compression tube inside the mast. I reassembled, this time with the spreader sockets in the mix, using silicone to protect against electrolysis between the stainless and aluminum components, and blue LocTite to fufill that role for the small #10 screws. I bolted everything up and tightened until I could see the external plates snug down under the compression, but not hard enough to cause additional damage or put undue strain on the bolt.
Because the aft lower shrouds had obviously been kinked at some point in their lives, I replaced them with 3/16" (stock is 5/32) terminated with HyMod fittings and replaced their turnbuckles as well. This also put a more appropriately sized pin into the chainplates, which were slightly wallowed out from the original, undersized one. I also replaced the lower backstay bridle, using the standard 5/32 wire.
Next standing rig upgrade will likely be the cap shrouds, followed by the backstay. I'll likely upgrade the backstay to 3/16" when I replace it. The forestay was replaced in 2002, when I resurrected the furler after I first got the boat, but I see some wear on the outer surface of the upper fork due to friction of the furler, so I will probably replace that again next year. Probably also do the forward lowers, just to be on the safe side.
The finished product is quite sturdy. My old-style, cast aluminum masthead also had suffered damage due to improper toggling at the top of the forestay, and I did some major rebuild/reinforcement on that the year before.
I inspect the spreaders, as well as the masthead, each time I take the mast down (twice a year, due to my coastal trips), and so far no discernible damage.
As a reminder, the spreaders should be adjusted so that they roughly bisect the angle the cap shroud makes when it attaches to them.
Rig tuning is an amazingly controversial subject for many people, and I approach the problem from a strength/reliability/cruising perspective. I side with the camp that says a shock load is bad, and that you should never see your shrouds go all slappy.
Once I have the mast aligned laterally and have the appropriate rake dialed in, I adjust my cap shrouds to about 15% of their rated breaking strength, then adjust the lowers to keep the mast in column under load. With the dacron main, I usually adjust the forward lowers until I have .75" to 1" of prebend, then adjust the aft lowers to that the max bend is no more than 2.25" of bend when I have max tension on the backstay via the adjuster.
Final adjustment happens while sailing, of course. Really heavy air can require more rig tension.
Jeff
s/v Windward
1978 C-26 #481
http://www.lizards.net
http://www.sv-windward.com
http://www.chryslersailing.com
s/v Windward
1978 C-26 #481
http://www.lizards.net
http://www.sv-windward.com
http://www.chryslersailing.com