How I replaced my Keel Brackets in the Driveway
Posted: Sun May 06, 2012 4:40 pm
Keel is back in, and other than paint, I am ready to go to the lake, again. This is how I did it, your milage may vary, there is danger involved, do this at your own risk! Yes these are large pictures.
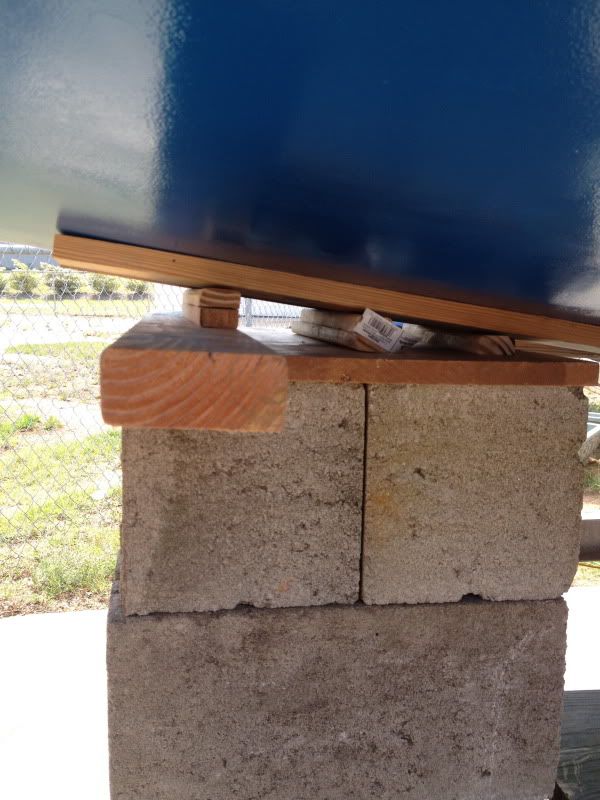
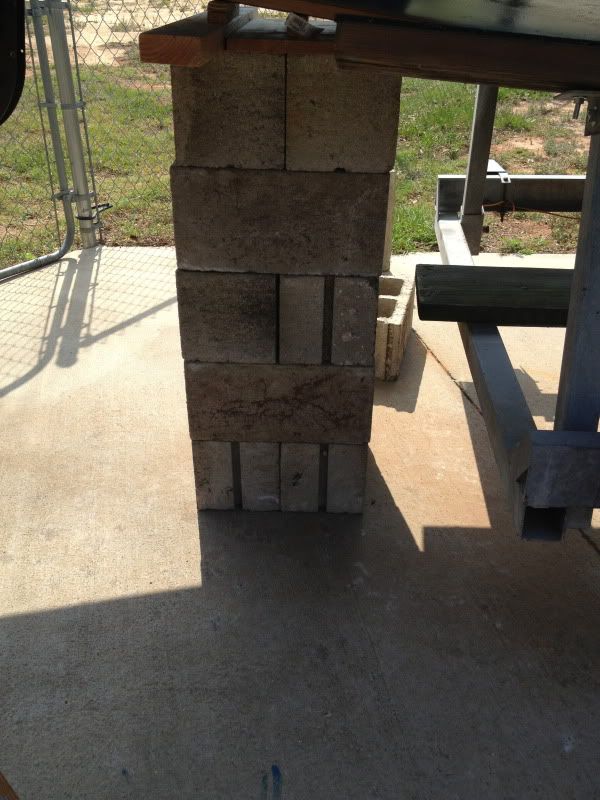
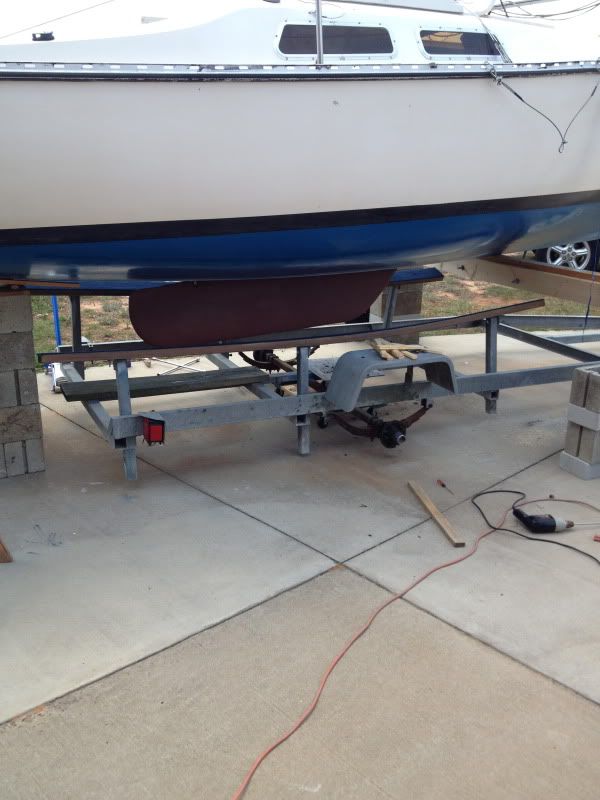
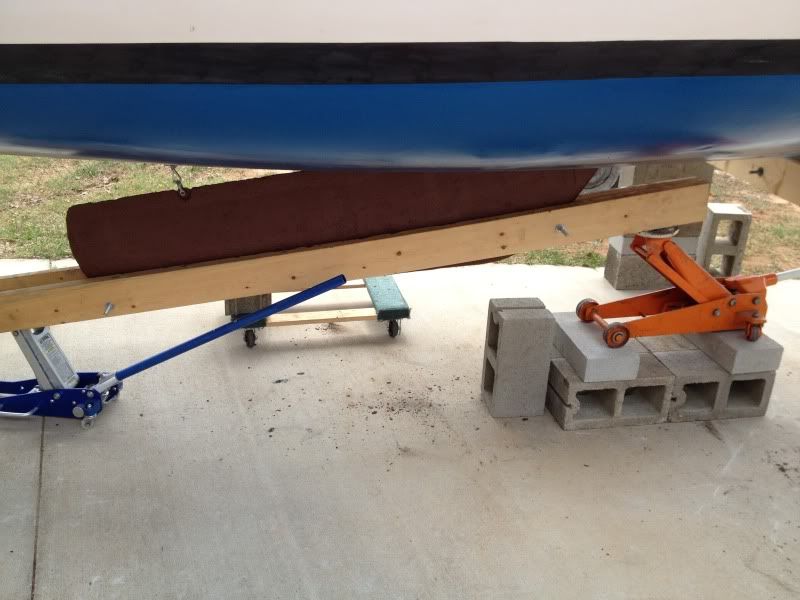
First was to raise the boat, I built a double stack of cinder blocks just fwd of the rudder, and used a 1x12, 2x4, and shims to build up a set of keel blocks. I lowered the nose of the trailer as low as I could with the blocks underneath, then raised the nose of the trailer tolift the rear of the boat off the trailer.
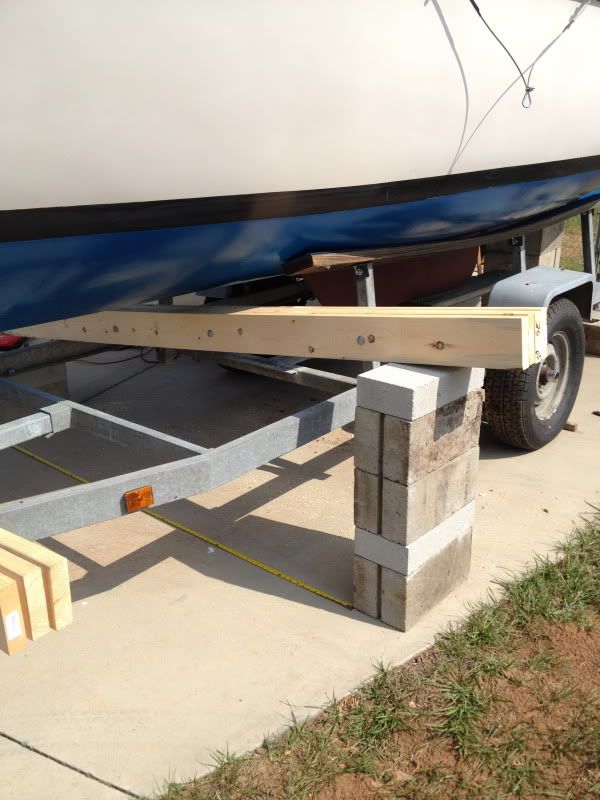
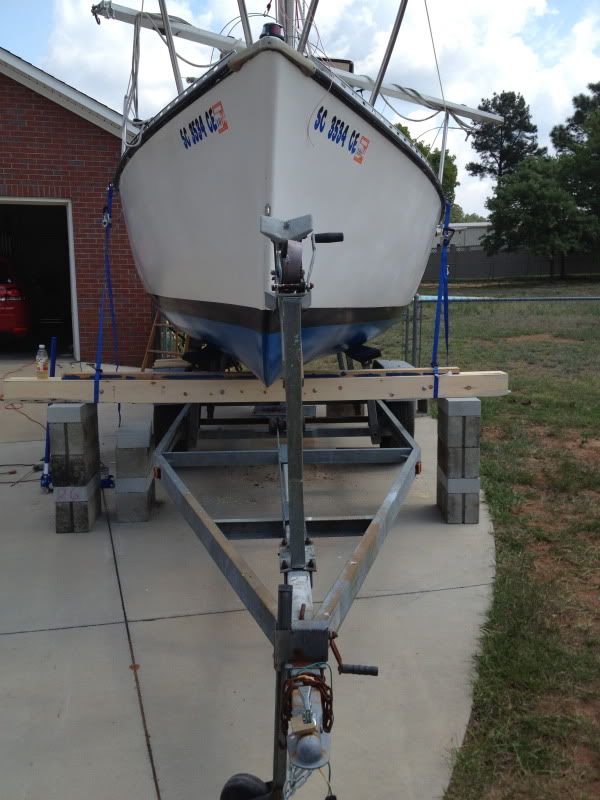
I lifted the front of the boat with two single stcks of cinder blocks, 4 inches farther apart then the trailer is wide. I made a beam out of 3 2x6's that I bolted together with 4 3/8 inch carrige bolts and nuts. I calculated the beam should hold about 4400 pounds, when I lifted the boat it never bowed at all.
I used a floor jack to lift each side, add a block, then lift the other side. I also added 4 inch solid blocks to distribute the weight evenly.
I did not raise the boat enough, and had to remove the wheels and used a mover's dolly under the axel to slide the trailer out.
I bult a sled out of 2 2x6's 8 feey long with a hole on each end and used a long eye bolt because I had them on hand. I sandwiched the keel and blocked it up and the sled made a good firm flat spot to use a floor jack.
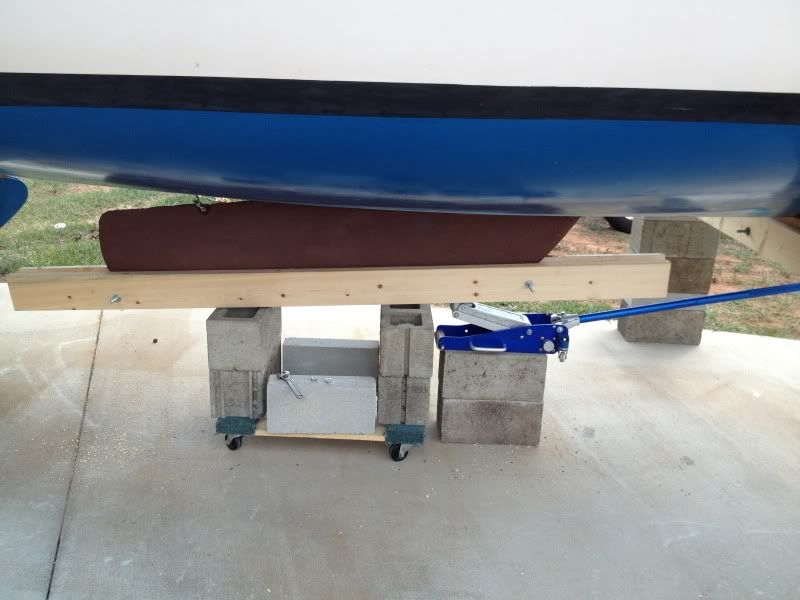
I wound up using the movers dolly with cinder blocks on it, to lower the kel and sled onto. I jacked up each end and removed blocks to lower the keel. Note that the center of weight iw way far forward on the keel.
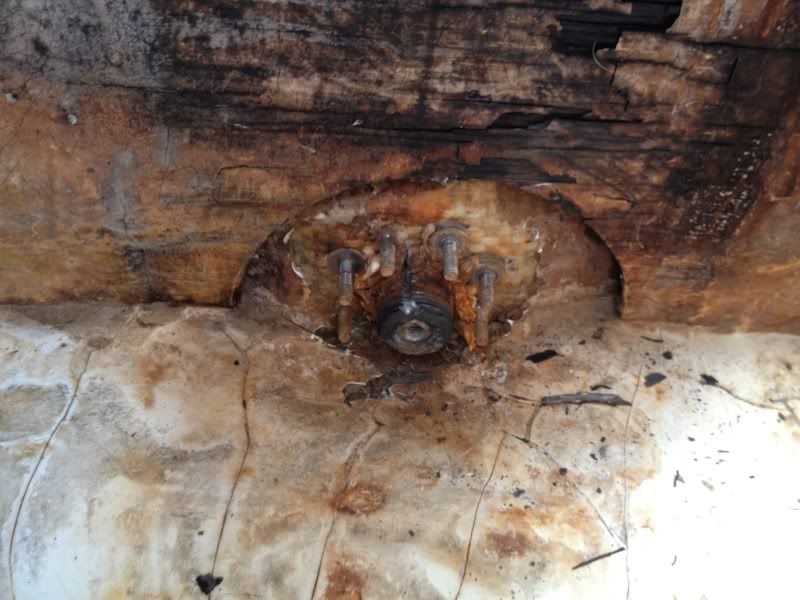
I got the cap off, but the old center pin was susted solid, or more specificaly the iron bracket had rusted completely to the pin. I wound up cutting the pin using a 7 inch cutoff wheel. In hindsight an 8 inch bimetal blade in a sawsall, A member pointed out to me you have to keep the speed slow to keep from burning the blade teeth off.
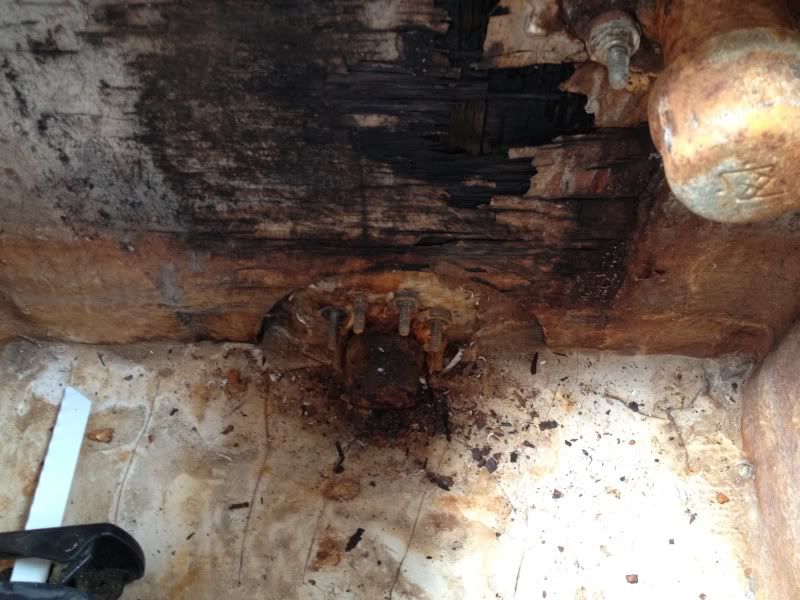
Then with the keel down I had to force the keel out of the trunk, the keel had swelled up because of all of the rust. Once the keel and sled was down on the movers dolly I used two ratcher straps to make sure the keel couldn't fall side to side.
I unbolted the old brackets, hammer the bolts from the inside and collected the old hardware. Someone had added 6 or so washers under each nut, the old brackets had rusted, and someone had tried to tighten them to stop a leak. There are tricks here. I used a 7/16 12 point box end wrench to remove the two lowest STBD nuts. The rest I got off with a 1/4 inch drive set.
I had to pry the old brackets out, there was still sealant holding them in, but the old brackets were about 75% gone. I scraped and cleaned the pocket.
I removed the plunger assembly since it had leaked and caused the wood inside to rot. The plunger was sealed with so much RTV that it didn't work. I sanded the inside of the pocket around the 5 holes for the plunger, then glassed over it. I usde a piece of alluminum foil and did the lay up on the foil then used a rubber glove to peel it off and apply it up in the trunk. I did 3 layers of BI on a 45 bias about 4x4 inches, then another 3 layers of bi about 6x6 inches to seal it.
The new stainless brackets were drilled and istalled with a bead or 5200 around all bolt holes, the perimeter and the center post. I used new hardware 1/2-28 x 1.25 inches long and new nylock nuts. The old hardware was 1.5 inched long and the thread portion was to long, hence the pound or washers I removed.
Once I positioned the keel back under the boat I hooked up the keel cable and used it to help position the keel. I marked horizontal and vertical guide lines on the keel to help show wher the hole was to aid in lining up the new brackets. I used a jack and keel cable to support the rear, raised the front up into the pocket.
Building a tower of cinder blocks again, a floor jack slide the keel fwd and back. With my daughter below and me in the boat we got the new pin through the keel, but couldn't get through to the STBD bracket. I figured that the keel was tilted to the side so lowered the jack, removed the wood sled, then jacked the keel up to straighten it out. Once straight the keel pin slid home.
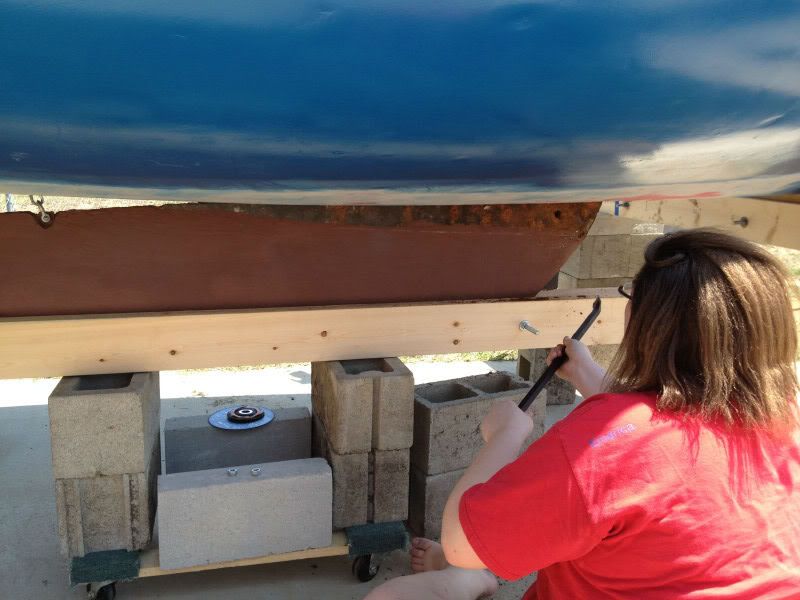
Only thing left is to finish chipping the keel, getting the rust off and painting it. The daughter again made with the chipping hammer.
For painting I chipped, used a rust wheel on an angle grinder and then Rustoleum Rusty Metal Primer, two coats. I then sanded it which showed me where we had missed areas to chip. Then more hammering, then two more coats of primer. Once the whole keel is primered I'll spray it with the final paint.
Hope this helps someone. It took 2 people 2 hours to jack up the boat, an hour to get the trailer out, 2 hours to cut the pin and lower the keel. * man hours to chip and paint the top 2/3 of the keel. 3 hours to drill and install the new brackets, and 2 people 2 hours to get the keel back up in and pinned. I think there is another 4 hours to chip and paint the rest of the keel.
Best of luck, Chuck.
First was to raise the boat, I built a double stack of cinder blocks just fwd of the rudder, and used a 1x12, 2x4, and shims to build up a set of keel blocks. I lowered the nose of the trailer as low as I could with the blocks underneath, then raised the nose of the trailer tolift the rear of the boat off the trailer.
I lifted the front of the boat with two single stcks of cinder blocks, 4 inches farther apart then the trailer is wide. I made a beam out of 3 2x6's that I bolted together with 4 3/8 inch carrige bolts and nuts. I calculated the beam should hold about 4400 pounds, when I lifted the boat it never bowed at all.
I used a floor jack to lift each side, add a block, then lift the other side. I also added 4 inch solid blocks to distribute the weight evenly.
I did not raise the boat enough, and had to remove the wheels and used a mover's dolly under the axel to slide the trailer out.
I bult a sled out of 2 2x6's 8 feey long with a hole on each end and used a long eye bolt because I had them on hand. I sandwiched the keel and blocked it up and the sled made a good firm flat spot to use a floor jack.
I wound up using the movers dolly with cinder blocks on it, to lower the kel and sled onto. I jacked up each end and removed blocks to lower the keel. Note that the center of weight iw way far forward on the keel.
I got the cap off, but the old center pin was susted solid, or more specificaly the iron bracket had rusted completely to the pin. I wound up cutting the pin using a 7 inch cutoff wheel. In hindsight an 8 inch bimetal blade in a sawsall, A member pointed out to me you have to keep the speed slow to keep from burning the blade teeth off.
Then with the keel down I had to force the keel out of the trunk, the keel had swelled up because of all of the rust. Once the keel and sled was down on the movers dolly I used two ratcher straps to make sure the keel couldn't fall side to side.
I unbolted the old brackets, hammer the bolts from the inside and collected the old hardware. Someone had added 6 or so washers under each nut, the old brackets had rusted, and someone had tried to tighten them to stop a leak. There are tricks here. I used a 7/16 12 point box end wrench to remove the two lowest STBD nuts. The rest I got off with a 1/4 inch drive set.
I had to pry the old brackets out, there was still sealant holding them in, but the old brackets were about 75% gone. I scraped and cleaned the pocket.
I removed the plunger assembly since it had leaked and caused the wood inside to rot. The plunger was sealed with so much RTV that it didn't work. I sanded the inside of the pocket around the 5 holes for the plunger, then glassed over it. I usde a piece of alluminum foil and did the lay up on the foil then used a rubber glove to peel it off and apply it up in the trunk. I did 3 layers of BI on a 45 bias about 4x4 inches, then another 3 layers of bi about 6x6 inches to seal it.
The new stainless brackets were drilled and istalled with a bead or 5200 around all bolt holes, the perimeter and the center post. I used new hardware 1/2-28 x 1.25 inches long and new nylock nuts. The old hardware was 1.5 inched long and the thread portion was to long, hence the pound or washers I removed.
Once I positioned the keel back under the boat I hooked up the keel cable and used it to help position the keel. I marked horizontal and vertical guide lines on the keel to help show wher the hole was to aid in lining up the new brackets. I used a jack and keel cable to support the rear, raised the front up into the pocket.
Building a tower of cinder blocks again, a floor jack slide the keel fwd and back. With my daughter below and me in the boat we got the new pin through the keel, but couldn't get through to the STBD bracket. I figured that the keel was tilted to the side so lowered the jack, removed the wood sled, then jacked the keel up to straighten it out. Once straight the keel pin slid home.
Only thing left is to finish chipping the keel, getting the rust off and painting it. The daughter again made with the chipping hammer.
For painting I chipped, used a rust wheel on an angle grinder and then Rustoleum Rusty Metal Primer, two coats. I then sanded it which showed me where we had missed areas to chip. Then more hammering, then two more coats of primer. Once the whole keel is primered I'll spray it with the final paint.
Hope this helps someone. It took 2 people 2 hours to jack up the boat, an hour to get the trailer out, 2 hours to cut the pin and lower the keel. * man hours to chip and paint the top 2/3 of the keel. 3 hours to drill and install the new brackets, and 2 people 2 hours to get the keel back up in and pinned. I think there is another 4 hours to chip and paint the rest of the keel.
Best of luck, Chuck.