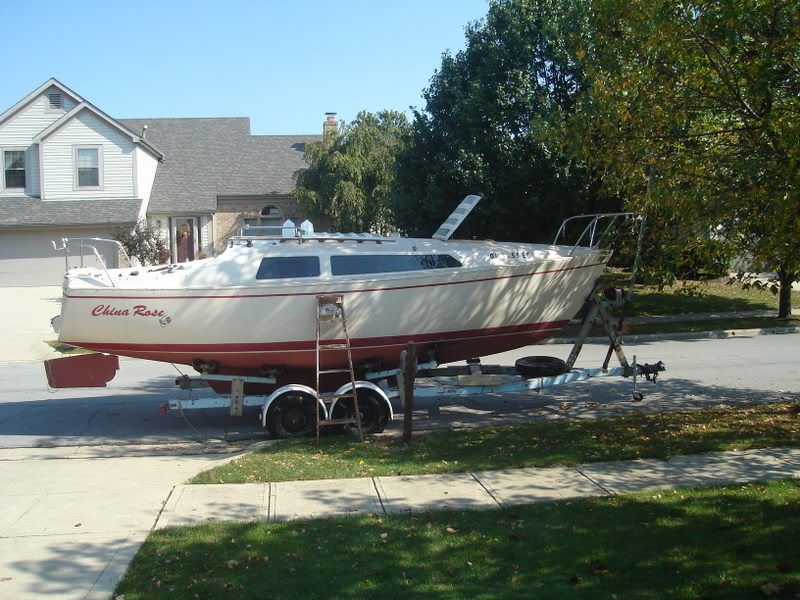
Page 1 of 2
topside paint
Posted: Sat Oct 06, 2007 3:13 pm
by ronc98
For those of you that have painted the topside of your boat, what type of paint did you use? I am going to repair my mast and all my spider crack so once that is finished I want to paint the top of the boat. I leaning towards the two part linear poly paints. Perhaps Sterling or Awlgrip. It is going to be a bit expensive to say the least.
Any advice?
Posted: Sat Oct 06, 2007 4:04 pm
by EmergencyExit
I'm thinking along the lines of doing that myself, will also be interested in other's input.
Posted: Wed Oct 10, 2007 2:55 pm
by keysskipper
Awlgrip is a great paint but can be tough to work with, if the boat is on a trailer and not in the water maybe overkill. I have used some great one parts ( easypoxy) with much success in a tough climate, if you can spray it as it can be tough to use a brush and roller and use a badger brush to smooth out, we sprayed Ragtime after doing several the hard way, looks factory finish, let me know when you get started for great tips.
May the tide always carry you home,
Keysskipper
Posted: Sun Oct 14, 2007 4:39 am
by ronc98
I keep my boat on the trailer so you might be right about Awlgrip being a bit overkill. However If I am going to do this right I do not want to have to do this again 3-4 years down the road. I am basically removing everything topside, fixing all the troubled areas then painting. I plan on keep this boat for along time. It is built like a tank and for what little I have in it it sails rings around many others.
I am stuck at rolling and tipping, I do not have access to a sprayer.
During all of this prep work I am going to strenghten the chainrails. I am sure they are fine but I want to make them a bit more beefier, I want to tie them into the bottom of the boat a little better.
Really the list goes on and on and on
Posted: Sun Oct 14, 2007 10:39 am
by keysskipper
I admire your desire to give her the best, still if you are using a two part and do not have lots of experience and knowing how much you want to
"do it right" consider the time you will save, the professional finish I think you desire, a decent airless even if only a one job use can be $200 or less,tip and gun this is what you want, using a badger hair is tricky, but
if you want do it the hard way let me know I'll send you some loaners, they are pricey..get back to me if you are doing this inside you have it made, we had to work with the weather as we sprayed Ragtime with
Easy Poxy in a open marina right on the ocean with the fixed keel it required ladders etc, by the way we used an old Wagner we bought for $40 bucks. Good Luck Fair Winds and take lots of pics, soon the old man will post some of Ragtime as sailing season is finally here. Keysskipper
Posted: Sun Oct 14, 2007 2:19 pm
by ronc98
Today was a good day of ripping things apart. I removed most of the componets topside and for the most part it was rather easy. I have found however that everything bedded into the boat was straight into the top, no epoxy inside the holes so they were a bit nasty. I will drill them out bigger epoxy all the holes to seal the core.
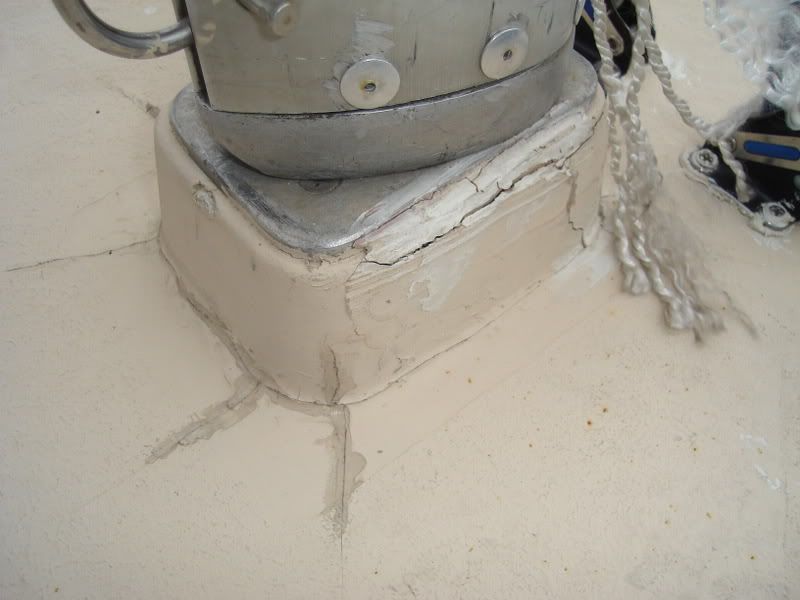
I still have not found the cause of the stress crack on the mast step. Everything looks solid from the hull to the post that runs to the sole of the boat. I have not been able to see where the post rests I might drill some access holes so I can see what is going on. There has to be a problem someplace right?
Keyskipper I might take your advice and spray the top end. I will however roll the primer since I can sand that. What kind of life do you get from your easypoxy paint?
Anyone have advice on how to gain acess to the mast support post?
One more thing i noticed is that the last person that did work on the boat used automobile bodypudy. Strange I would thing they would have used some sort of epoxy? I have also noticed that they used ALOT of the spray foam that you find at home depot. Weird again
Posted: Sun Oct 14, 2007 6:14 pm
by Bhacurly
Hey All,
I will be doing some top side painting also, so thanks from me for the tips!
RonC,
That mast step to me looks like some loose rigging or a biffed job raising or lowering the mast. More than the usuall wear and tear ya know... Nice thing is, since your gonna paint anyway, just take all the hardware off, and use a dremmel to clean all that crap off, and open up all them cracks. After a bit you'll recognize the good glass and the junk. Don Casey's book "Hull & Deck Repair" is a good resource for doing this kinda job. Glass is "easy" to work with and you can also do it over after grinding again if ya screw it up untill it looks the way you want. So don't be afraid to tear into that junk!
The mast support inside on my boat had some teak wood on the top and botton, just unscrewed them and had to bang the support out. Nothing was actually holding it in place but pressure and the teak. The mast wiring runs up through it so be careful. I rewired my mast while it was all apart anyway...
Posted: Mon Oct 15, 2007 2:26 am
by ronc98
I am hoping that the damage is a botched mast raise. It does look pretty gross. I have Dons hull repair and painting books. Next on the list is Canvas work. Pretty good info in those and makes it look rather easy.
The C-26 does not use a metal pole, it uses a compress fiber 3x3 peice of wood for the support pole. It looks like it is in good shape but not sure about the bottom since it seems to go down into the bottom of the boat where i can not see. I am trying to decide if I want to replace with a pole like the C-22 has.
Thanks for all the advice everyone.
Posted: Mon Oct 15, 2007 5:41 am
by EmergencyExit
From a Good Old Boat article I read on replacing the sole - the wooden support for the mast should go thru the hull liner there in the head and terminate on the part of the main sole that extends from the cabin to under the head - given the number of problems C26's have with cabin sole rot that may be the bad spot -
I'm thinking of adding an inspection port there in the head so I can replace that terminus, adding a metal pole, and then keep an eye on that area.
Posted: Mon Oct 15, 2007 8:00 am
by ronc98
Thanks for the advice. Where does all the water come from that is causing the sole problems? Since the keel bracket is outside the hull it can not leak there. Are the bolts that hold the keel on the C-26 terminate inside the hull?
Posted: Mon Oct 15, 2007 8:38 am
by EmergencyExit
Don't know about the keel bolts, they might do that, also I think if the caulking between the keel shoe and the hull is gone, that may contribute
Here's my story - and there are some pics of the rear sole removed on my website.
http://www.home.bellsouth.net/personalp ... P-sailtalk
What I found was the small bilge under the stern berth extends under that area of the sole below the ladder, about up to where the winch cable goes down. From there forward is the ballast pour which is concrete with lead pellets on the 79 model, and lead bars encased in foam in some earlier models. That foam has a habit of holding water once soaked, too.
On mine, the ballast pour comes to about an inch below the fore part of the cabin sole (under the table to the head area). Water from that rear bilge can fill up the rear cavity, overflow on top of the ballast pour and travel forward to the head area. The way the bilge slopes it doesn't take much water under the stern berth to translate into a full area under the sole !
I sealed off the rear cavity from the area over the ballast pour so this can't happen again. Also made the rear sole area into a hatch for inspection, etc.
Also take into account that ours had 2 inches of water in the cabin when we found her, no telling how long that had been there from all the leaks !
Posted: Mon Oct 15, 2007 9:03 am
by ronc98
Thanks for the help.
Tonight I will cut an access hole in the floor in front the keel to inspect that area. The rear area looks ok. I have never had more then 0.25 of water in the rear bilge area. I have just not been able to figure out why I get water there. The front area is dry from what I can see of it. I can wiggle into the front hatch and can see under the head area.
Posted: Mon Oct 15, 2007 3:19 pm
by ronc98
I drilled a series of holes in the cabin sole and to my suprise it is all bone dry and the wood is in great shape. Good news for a change! It looks like all the mast step damage was caused by a botched job at raising it. I did notice that the step knuckle has a little bend to it.
I am going to drill a 3" hole through the topside to install a solar vent. This will give me a good chance to see what the core looks like. I am hoping that is in as good of shape as the cabin sole is.
Posted: Mon Oct 15, 2007 3:53 pm
by EmergencyExit
Good news, then - hey, what was under your sole ? concrete with bb's ? brown foam ? yours is a 77, right ?
Posted: Mon Oct 15, 2007 4:09 pm
by ronc98
I am not sure because there is a layer of black epoxy that runs the length of the boat from front to back. It has to be stock since there is no way to get under the sole after it is together. I am certain there is no foam.
Posted: Thu Oct 18, 2007 3:04 pm
by ronc98
Posted: Tue Oct 30, 2007 3:08 pm
by ronc98
It has been a busy few weeks. All the hardware is off and I have filler every hole, crack and craze with epoxy. The mast step was pretty easy to fix. it was mostly cosmetic, the glass around it was in good shape. In the next few days I will do the final sand before I start with the Awlgrip 545 primer. Anyone every roll this on and have any tips and hints? From what I have been told the surface needs to be as close to flawless as possible since it is not a high build primer. I am pretty sure it is close. I plan on three coats of the primer so the first coat will show what I missed I hope.
I will post some pics in the next few days.
R
Posted: Wed Nov 07, 2007 4:27 pm
by keysskipper
Ron, wow she is a beauty, same color as our C-26, can't wait to see it in the Keys, as far as the EasyPoxy it still looks fantastic a spray finish is best for you seeing your topside, was on Ragtime today checking for leaks we had 24" of rain in October the EasyPoxy still looks new but it has only been on 8 months the adhesion is great and the Off White factory color is a exact match to the original finish, they have the burgandy as well, Pettit is a great bottom paint as well, $400 per gallon for the trinidad, good luck on her restoration and keep posting pics, I know I need to but not sure how, hurry down the wind and weather perfect.
Fair Winds and happy sanding,
Keysskipper
Posted: Wed Nov 07, 2007 5:38 pm
by ronc98
At this rate I am ready to just bring her down so I can paint her. A week after I got her stripped and ready to paint we have had a cold front come in that has not left. She sits with two coats of 545 primer waiting for some warm weather. I am going to start topcoat tomorrow and use halogen lights to heat the hull a bit. I will be right at the 60 degree mark in my store unit. If all goes well it is suppose to be warmer for the next week so I might get the smooth section of topcoat done. My big problem at this point is I did not get the accelerator when I got my paint and no one in ohio stocks awlgrip I have to order it in. Bummer!!!!!
if you send me pics I will be more then happy to post them for ya.
R
Posted: Sat Nov 10, 2007 2:34 pm
by ronc98
Two coats on the topside done and maybe done with the smooth part. I will take a look at it tomorrow and decide if I am doing three coats. I do have plenty of paint so that is not a issue. I have to say Algrip is a bit amazing how it rolls out. The topcoat covers much better then the 545 primer. The important thing to remember is that the hull needs to be smooth because the paint will show everything on the hull. With that in mind it is amazing. The mirror like finish it turns into when rolled and tipped is something you would not beleive unless you seen it.
I will post picts soon.
Posted: Fri Nov 16, 2007 10:55 am
by ronc98
Posted: Fri Nov 16, 2007 11:44 am
by EmergencyExit
Oh, man, that looks great ! Everything looks good, and I don't think I've ever seen a cockpit look that clean
Posted: Fri Nov 16, 2007 2:59 pm
by ronc98
Thanks
It has been a challenge to say the least. I was done last weekend with all the painting but had to start over when outside my storage unit a huge desiel bus was started and it belched black soot into my unit causing fisheyes all over the boat. I ended up sanding it down AGAIN and started the painting all over again. This put be at the very bottom end of paint temps. Awlgrip gets a bit tricky when the temps drop into the 40 and 50's Does not flow well and you tend to get runs and sags.
All in all I used about a gallon total of LPU paint and about 1/2 gallon of 545 primer. I bought way way way more paint then that so I am not sure what I am going to paint next.

Posted: Sat Nov 17, 2007 3:47 pm
by keysskipper
Fantastic!!! looks awesome and like you have done it before!! WOW
I no linger want you to bring her to the Keys, very jealous, we all hate you now. now I must go and make my cockpit look like that, you are very talented. Fair Winds, Keysskipper

Posted: Sun Nov 18, 2007 4:15 pm
by ronc98
I ended up putting another coat on the nonskid today. The previous color was just to yellow. I ended up with a flat/white/silver awlgrip mixture. With four coats(color changes) of awlgrip it will be the toughest non-skid around.
I am not finding myself wanting to replace alot of the weathered rigging on the topside. I did not plan to do this when i started but for a few extra bucks I might as well. Since I made my own windows I have a little extra in the budget for this.
Posted: Mon Nov 19, 2007 8:17 am
by Gus
Well, I was one of those 'don't paint the topside' guys, but you sure shut my mount! Your boat looks like it just came out of the mold! Great job!!
p/s I recommend you to replace those factory headlights. I tried to save the ones in my boat. They get way too hot, they iluminate almost nothing, and use a lot of juice! I ended up using 2 flourecent lights from Walmart. They run with batteries, or 12v

Posted: Mon Nov 19, 2007 9:44 am
by ronc98
I am going to replace all the internal lights as well as the navigation lights with LED clusters. I have a bunch or red, white, blue and green cluster arrays from another project so I am going make them switchable from white to red for night sailing.
I am a bit surprise how hard the Awlgrip is so far. It does look much better then what it used to. It is nice to look at a smooth surface and not see crazing everywhere.
Internal work starts this weekend. I have a battery box and a chain locker to glass in. I also think I am going to put the cockpit ladder on hindges so I can swing it out of the way to get into the aft berth a little easier.
Posted: Mon Nov 19, 2007 5:47 pm
by Gus
Oh that's great! I have a friend with a P-18 with red lights for night sailing, but beware! when we are docked, people ask him where the girls are inside that little boat
Fantastic job with the Algrip, like I said, the boat looks like fresh out of the molds!
Gus
Posted: Tue Dec 18, 2007 4:55 pm
by ronc98
Portlights
Posted: Wed Dec 19, 2007 7:04 am
by Windwalker
Great job!, Now I'm going to have to follow suit, as soon as I get my shop moved.
I'll ask the question most are thinking, are those new portlights and where did you get them. I have the original aluminum frames that I replaced the lexan, but am searching for good replacements. Looks like you may have found some!
Share, Please!