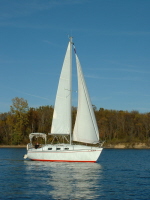
Those of you who trailer sail, and step the mast twice every trip out may want to take a look at that step plate -
pic link at the end
Was lowering EE's mast (using the boom rig, but with the trailer winch) to retrieve a jammed halyard, and just as it was almost down there was a rather loud crash. At first I thought the mast had slipped off the hook and fallen the last few feet, was sure happy to find no mast damage.
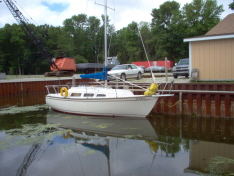
Went on deck to see what happened - since I was using the trailer winch I wasn't standing on the deck which may be a flaw in doing it that way-you need to be on deck to watch over the process closer. What I found was a missing plate and an ugly mess of a step.
I think the mast and step hook got bound up, and the pressure on the step hook was too much, and the plate was ripped off and flung overboard - glad I was on land, found it about 10 feet from the boat. Don't think it would have floated !
What I found might give trailer sailors a reason to beef this area up, and I've posted some pics at a link below. Under the step plate was a 1/2 layer of glass with no chopped mat in it, just solid green glass. Under that was a block of wood. In my case there was a large area where the wood was perfectly smooth, no mechanical bond between the glass and the wood seemed to exist. Also about the only part of the screw that was in the wood was the tapered end.
Of course most of the time the step plate just has the mast sitting on it so it's not going anywhere BUT if you trailer sail and put force on that hook everytime you step the mast you may want to increase the length of those screws a bit to get a better bite into the wood to avoid a potential rip out.
No big deal on the repair, the damage left a nice little bowl to fill with chopped mat and resin, I added the step plate to the top of that and screwed it down to assure everything would be level, etc.
Mast Step Reinforcement Needed?
-
EmergencyExit

- Site Admin

- Posts: 2954
- Joined: Wed Dec 10, 2003 5:02 pm
- Location: Mississippi Gulf Coast
Mast Step Reinforcement Needed?
Last edited by EmergencyExit on Sun Jul 20, 2014 1:26 pm, edited 1 time in total.
While you are at it you might as well replace the compression post. That is another weak link,
When I fixed my mast step over the winter I noticed the same thing. I am a bit suprised more of these steps are not showing cracks.
I used much longer screws when i put the step back on.
Glad no one got hurt. It is a good thing you were not on the deck,
When I fixed my mast step over the winter I noticed the same thing. I am a bit suprised more of these steps are not showing cracks.
I used much longer screws when i put the step back on.
Glad no one got hurt. It is a good thing you were not on the deck,
-
EmergencyExit
- Site Admin
- Posts: 2954
- Joined: Wed Dec 10, 2003 5:02 pm
- Location: Mississippi Gulf Coast

-
Guillaume C.
- Posts: 121
- Joined: Wed Dec 13, 2006 6:40 pm
-
Chrysler20%26
- Posts: 836
- Joined: Mon May 01, 2006 10:28 pm
- Location: Pinconning Michigan
- Contact:
More things to do, an look over
EE you have a lot of good sailing days comming. Thank you for the post.
-
Chrysler20%26
- Posts: 836
- Joined: Mon May 01, 2006 10:28 pm
- Location: Pinconning Michigan
- Contact:
Boom Rig
I have not even made up a Boom Rig, an have not rased the mast on my c-26. But I think that is what caused your failer, as your mast was comeing down it must have been in a big strean. Don't know what kind of line you use but it must not be able to strech much. I would leve a littel slack in it, better to alow the mast a little sway. I hope you don't have any more troble, I know of no one, that has worked as much on a boat. Hope you have maney days of happy sailing.


for a small order I'll go to west marine, but if you want quantity at good prices try www.boltdepot.com
Gus
Gus
1976 Chrysler 22 Halve Maen - Sail # 595
Well popped mine off today and appeared to be solid and the screws seemed to have a good hold so I will just recaulk it and leave it be for now. I could tell the mast step was cast and not milled from a billet. It does show some signs of stress where the tongue turns back so I'll probably be replacing it with a more conventional stainless mast step at some future time.
-
EmergencyExit
- Site Admin
- Posts: 2954
- Joined: Wed Dec 10, 2003 5:02 pm
- Location: Mississippi Gulf Coast
-
essen48183
Sawed mine right out, fill themcracks right or you could too
Those little stress cracks were present on mine when I bought it and I thought "no big deal". As time went on and the mast came up and down while I was refitting the boat they got much worse. They went a ways out laterally and I bought resin/filler to do the repair, but hadn't got to it yet. Then one day I heard a loud crack and it split down the side. I wasn't sure whether to cut the top layer out and drill it out and recore it or what. So I made a few inspection holes finding wet wood in the core and cracked solid resin in the honeycomb around it and in the crack that I thought was new (It was there before and someone filled it with unthickened resin) I ended up cutting almost from hatch to hatch and a little wider than it was long and removing the whole step. Once off I drilled it out to learn what made it fail. There was evidence of several attempts to drill holes and fill with resin, two depths of drilling out the cedar and replacing with plywood and resin.
It appears that the original stress cracks and the 6 screw holes allowed water to get in and expand/contract making them large enough to cause the P.O. to fill them with resin... but he didn't allow it to dry out and he used straight resin. The forces of sailing something so brittle as straight resin caused it to really crack, so he filled that in around the sides and drilled out as much as he felt was necessary and recored it (and then half assed painted it with similar colored spray paint.) Then he or the next owner tried the same repair as he did.
Moral: don't let stress cracks around that spot of your boat go. grind them bigger and fill them with epoxy resin thickened with high density filler. Seal above and below the screw holes with 5200. If you (or the person who owned it before you) let them go and water has entered the core, you are in for one hell of a repair. Same goes for mast wiring right next to the step. When looking at a used boat, look for signs of a poor previous repair. (Mine had a different color of paint in the area around the mast step, but I wasn't smart enough to run.)
I ended up way overbuilding it with some serious layers of epoxy resin and cloth, marine plywood, a maple block with vertical grain, way oversize drilled the locations that would receive each screw and filled them with high density filler then covered the whole thing with more layers of resin/cloth then faired the whole thing in a nice square to the level of the smooth part of the deck near each hatch. Painted the whole area of nonskid so you can't tell it was done (you spend that much time doing it right you don't want people to say what happened here? Which is why the spray paint should've caused me to run!) Overdrilled 404'd and 5200'ed the mast wiring as well. Also used 5200 on the screws and mast step hook on installation.
You can't tell I did it, and it is strong. And it won't leak. And if it ever does, It won't get to the wood.
As far as the screws go... It is my opinion that you want them to be the weak point and if that mast is coming down because your shrouds broke, you'd hope the screws break loose before the whole fiberglass chunk is ripped out. So I used the original screws to save time and labor in the event of a catastrophic failure.
For those of you with little hairline cracks: an ounce of prevention would be to grind out all the cracks and fix them proper and paint the whole nonskid area... then use 5200 to prevent water leaking down the screws.
Also, in the defense of the previous repairs... it is a 1979 boat and I don't know how much mileage they got with those partial repairs... could've been many, many years.
Essen
-
EmergencyExit
- Site Admin
- Posts: 2954
- Joined: Wed Dec 10, 2003 5:02 pm
- Location: Mississippi Gulf Coast
Great post, thanks !
I wound up only added 1/2 length to the screws, as I also considered what would happen should be it happen again and that area was overbuilt ! You're right, it could make a heck of a skylight at the mast step.
I have the supplies to fill those cracks around mine, guess I should get in gear with it, was planning on painting the non-skid on the topsides beige anyway.