Now i just gotta learn to use the camera better!
http://www.facebook.com/home.php?#!/alb ... um_comment
Spent some time stripping the keel this evening. Plan is to prime and paint the part above the sled, then re-install it, remove the sled and then prime & paint the rest.
A few pictures finally
A few pictures finally
Tranquil Chaos
I don't have a Facbook account, so I guess I'll have to get my son to open these up for me. Got my hopes all up for a photo fest and I can't see them yet. 
Thanks
Alan
Thanks
Alan
It's a good life on the
Honu, 1976 C-22
My Chrysler Sailing Photos: http://s1297.beta.photobucket.com/user/ ... ry/Sailing
Honu, 1976 C-22
My Chrysler Sailing Photos: http://s1297.beta.photobucket.com/user/ ... ry/Sailing
Bummer. I established a photobucket account. Now just have to get everything into it. Went out of town for the weekend and just got back. Got the keel painted to the point that I can reconnect it to the hull. The brackets should be back in tomorrow and then start to move the keel into place.
Life - and progress on the boat - continues.
Life - and progress on the boat - continues.
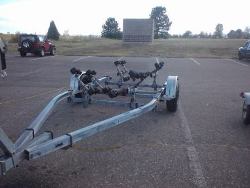
Paul, Looking at your pics I noticed your trailer has no leaf springs. Am I seeing that right? I would still like to get my boat a little lower to the ground overall and this could be a good way. Just wondering how the boat rides or if you even use the trailer on the open road. BTW, you can check out my boat on my fb. Search "Jeff McKamey" and send a friend request.Jeff
-
CaptainScott
- Site Admin

- Posts: 3112
- Joined: Wed Sep 24, 2008 10:46 am
- Location: Washington State
- Contact:
OK I photobucketed tonight. Haven't figured out how to get them in the order I want yet, but they're in there. Two albums so far: The swing keel, and the beginnings of building a rudder - although I really like the carved high density plastic somebody else did.
Now let's see if I know how to get you there!!!
http://s814.photobucket.com/albums/zz65 ... 0Building/
Now let's see if I know how to get you there!!!
http://s814.photobucket.com/albums/zz65 ... 0Building/
It's a good life on the
Honu, 1976 C-22
My Chrysler Sailing Photos: http://s1297.beta.photobucket.com/user/ ... ry/Sailing
Honu, 1976 C-22
My Chrysler Sailing Photos: http://s1297.beta.photobucket.com/user/ ... ry/Sailing
-
CaptainScott
- Site Admin
- Posts: 3112
- Joined: Wed Sep 24, 2008 10:46 am
- Location: Washington State
- Contact:
Thanks Alan! Something about old sea dogs and new tricks comes to mind here.
BTW: Got the brackets back in yesterday. Thought I had the boom done (had to change goosenecks) When I lifted it something clunked inside. Drilled out the rivets and removed the boom end and, as some of you might guess, found the 5/8" gin pole pin inside - and bent at about a 30 degree angle! The boom is lighter now and will be going back together soon.
BTW: Got the brackets back in yesterday. Thought I had the boom done (had to change goosenecks) When I lifted it something clunked inside. Drilled out the rivets and removed the boom end and, as some of you might guess, found the 5/8" gin pole pin inside - and bent at about a 30 degree angle! The boom is lighter now and will be going back together soon.
Wow, I don't even want to think about how it got bent!Paul wrote:Thanks Alan! Something about old sea dogs and new tricks comes to mind here.
BTW: Got the brackets back in yesterday. Thought I had the boom done (had to change goosenecks) When I lifted it something clunked inside. Drilled out the rivets and removed the boom end and, as some of you might guess, found the 5/8" gin pole pin inside - and bent at about a 30 degree angle! The boom is lighter now and will be going back together soon.
It's a good life on the
Honu, 1976 C-22
My Chrysler Sailing Photos: http://s1297.beta.photobucket.com/user/ ... ry/Sailing
Honu, 1976 C-22
My Chrysler Sailing Photos: http://s1297.beta.photobucket.com/user/ ... ry/Sailing
The Keel Pin is IN
Good night, Alan. Next you'll be threatening to come to Denver and do it yourself, or invite me (hint) out to Seattle (my old stomping grounds) to spend some time learning to sail with you!
Great news: The boom is indeed back together, and so is the keel. It was a challange because I know this is supposed to be a multi-person task so you don't have to make 20something trips under the boat, then into the boat, then under the boat.... But I had to finish this one solo - just me - alone . Here's how I did it:
1) wait until dark
2) Shine a flashlight through the keel bracket from the inside of the boat.
3) Move the keel directions needed until the light shines through the hole to the other side.
4) Use a narrow, flat balde screwdriver from inside the boat to find which edge of the keel is not precisely lined up with the bracket. Adjust the keel using this approach until the keel pin slides through.
5) Grease the port side spacers and slide into place. Again, use the light to get the hole lined up.
6) Back into the cabin, use the screwdriver to lever the spacers so they are precisely aligned. The keel pin should now slide through them and the keel.
7) Grease & repeat with the starboard spacers.
 A few taps with the hammer and the keel pin went in!!!!!!!!!!!
Great news: The boom is indeed back together, and so is the keel. It was a challange because I know this is supposed to be a multi-person task so you don't have to make 20something trips under the boat, then into the boat, then under the boat.... But I had to finish this one solo - just me - alone
1) wait until dark
2) Shine a flashlight through the keel bracket from the inside of the boat.
3) Move the keel directions needed until the light shines through the hole to the other side.
4) Use a narrow, flat balde screwdriver from inside the boat to find which edge of the keel is not precisely lined up with the bracket. Adjust the keel using this approach until the keel pin slides through.
5) Grease the port side spacers and slide into place. Again, use the light to get the hole lined up.
6) Back into the cabin, use the screwdriver to lever the spacers so they are precisely aligned. The keel pin should now slide through them and the keel.
7) Grease & repeat with the starboard spacers.
Tranquil Chaos